
Introduction: Why Garage Organization Matters
The garage is one of the most versatile yet underutilized spaces in the home. For many, it serves as a dumping ground for everything from seasonal decorations to sports equipment, tools, and forgotten DIY projects. The result? A cluttered, chaotic space that’s hard to navigate and even harder to use efficiently. However, investing in garage organization is a game-changer. It not only maximizes your storage capacity but also improves safety, boosts home value, and transforms your garage into a functional extension of your living space. Whether you dream of a workshop, a workout zone, or simply want to park your car without zigzagging through piles of clutter, a garage organization overhaul delivers lasting benefits. This in-depth guide walks you through every step of the process—from initial planning and tool selection to zoning, storage solutions, and budgeting—ensuring your transformation is both practical and cost-effective. Let’s turn your garage from a headache into one of your home’s most valuable assets.
Step 1: Assessing Your Garage and Setting Goals
Analyze Current Use and Identify Pain Points
Begin by evaluating your garage’s current state. Walk through the space and take note of what’s stored where, which areas are most cluttered, and items that rarely get used. Common problem areas include overflowing shelves, scattered tools, and hard-to-reach corners. Photograph the space from multiple angles for a clear before-and-after comparison.
Define Your Garage’s Purpose
- Will it remain a parking space, or double as a workshop?
- Do you need storage for sports gear, gardening tools, or seasonal decorations?
- Is there a need for a hobby area or extra pantry storage?
Write down your top priorities. Clear objectives help you make smart decisions regarding layout and storage solutions.
Measure and Map
Accurate measurements are crucial. Measure the length, width, and height of your garage, noting any obstructions (windows, doors, outlets, water heaters). Sketch a simple floor plan on paper or use free online tools. This helps you visualize potential layouts and avoid costly mistakes later.
Step 2: Decluttering and Sorting
Empty and Categorize
Remove everything from the garage and group items into categories: keep, donate, sell, recycle, or discard. Be ruthless—if you haven’t used something in two years, it’s likely time to let it go.
Tips for Efficient Decluttering
- Work in zones—tackle one wall or corner at a time.
- Use stackable bins or boxes for sorting.
- Schedule a donation pickup in advance to encourage follow-through.
Hazardous Materials
Properly dispose of old paint, chemicals, or batteries at your local hazardous waste facility. Never throw these items in the trash.
Step 3: Planning Zones and Layout
Establish Functional Zones
Organize your garage by usage zones. Common zones include:
- Automotive: Car care supplies, spare tires, fluids
- Tools & Workshop: Hand tools, power tools, workbench
- Sports & Recreation: Bicycles, balls, camping gear
- Garden & Outdoor: Lawn tools, pots, fertilizers
- Seasonal Storage: Holiday decorations, winter gear
Assign each zone a logical location based on frequency of use and accessibility. For instance, frequently used items should be closest to the entry, while rarely used items can be stored up high or in less accessible areas.
Optimize Floor Space
- Keep the center clear for vehicles or large projects.
- Utilize vertical wall space for storage and organization.
- Consider ceiling-mounted racks for bulky, lightweight items.
Step 4: Selecting Storage Solutions
Types of Storage Systems
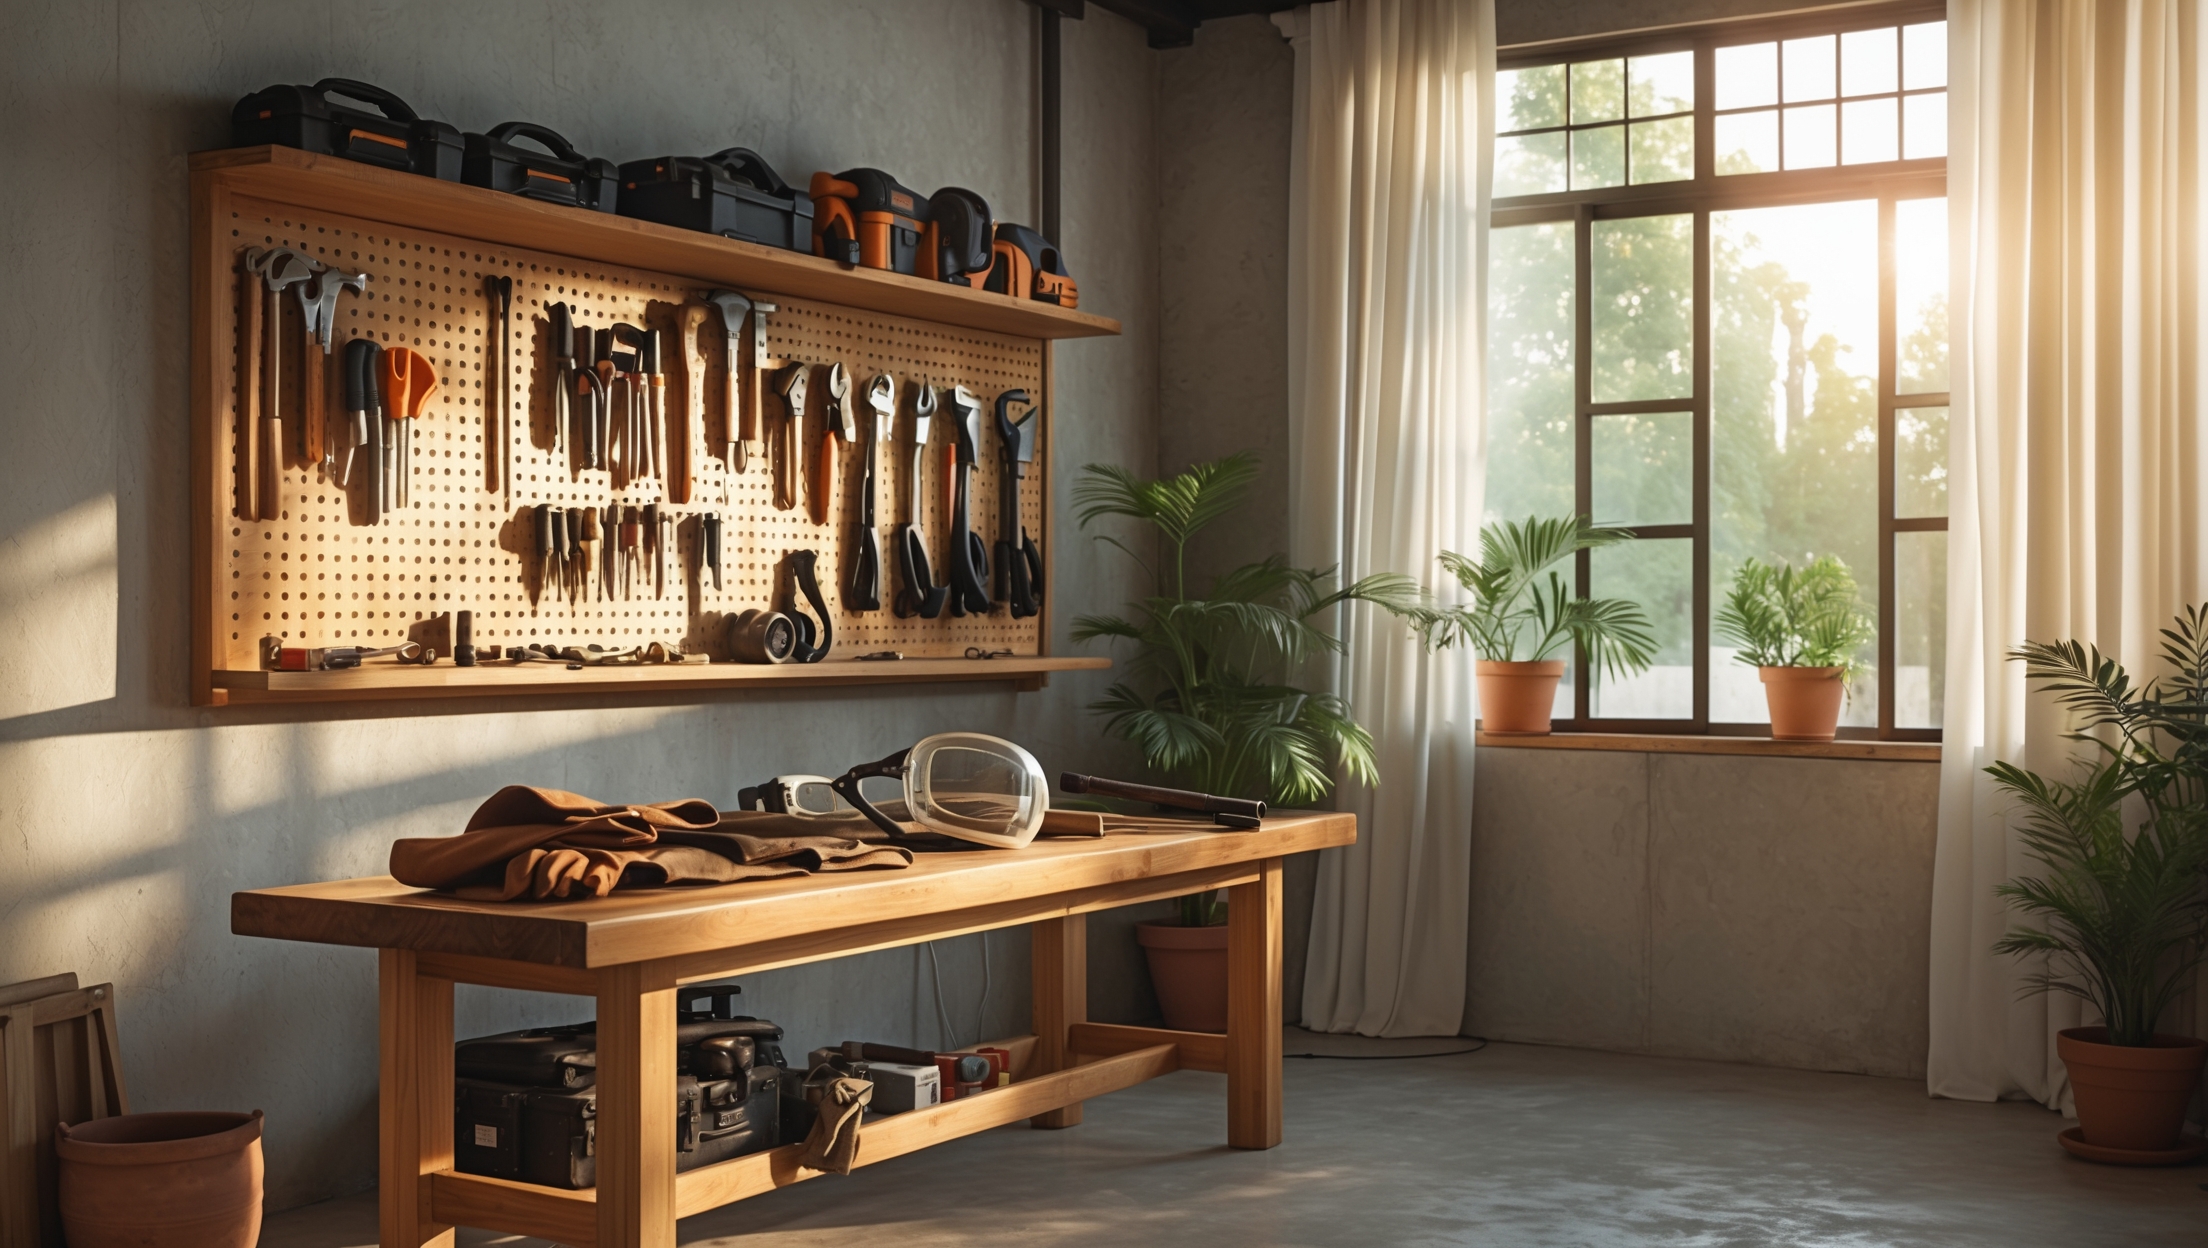
- Wall-Mounted Shelving: Adjustable metal shelves maximize vertical space and can hold heavy loads.
- Pegboards: Ideal for organizing hand tools and supplies for easy visibility and access.
- Cabinets: Lockable units keep hazardous materials or expensive tools secure and dust-free.
- Overhead Racks: Great for storing seasonal items or bulky gear off the floor.
- Storage Bins: Choose clear, labeled bins for small items or infrequently used belongings.
- Slatwall Panels: Versatile panels with hooks, baskets, and shelves for customizable storage.
Pros and Cons of Popular Storage Options
- Metal Shelving: Durable, supports heavy items, easy to adjust. However, it can be costly and may require anchoring for safety.
- Plastic Shelving: Budget-friendly, lightweight, but limited weight capacity and less durable.
- DIY Built-Ins: Fully customizable and cost-effective if you have carpentry skills, but require time and tools.
Step 5: Tools and Equipment Checklist
Essential Tools for Garage Organization
- Power drill and driver bits
- Stud finder
- Level
- Measuring tape
- Utility knife
- Hammer
- Socket set or adjustable wrench
- Screwdrivers
- Step ladder
- Label maker or permanent markers
- Safety gear: gloves, safety glasses, dust masks
If you plan to install heavy shelving or ceiling racks, consider renting a hammer drill or impact driver. For larger projects, a circular saw or miter saw may be needed for custom shelving.
Recommended Supplies
- Wall anchors and screws (appropriate for your wall type)
- Heavy-duty brackets
- Storage bins (clear or color-coded)
- Pegboard hooks and tool holders
- Paint or sealant (if refreshing walls or floors)
Step 6: Budgeting Your Garage Overhaul
Typical Cost Ranges
Your budget depends on garage size, chosen materials, and the level of customization. Here’s a realistic breakdown for a standard two-car garage (approx. 400 sq ft):
- Wall Shelving: $100–$350 per section
- Pegboard System: $30–$100 per panel
- Cabinets (lockable): $200–$600 each
- Overhead Racks: $150–$350 each
- Storage Bins: $8–$25 each
- Slatwall Panels: $100–$250 per wall
- Workbench: $150–$500 (pre-made) or $75–$200 (DIY)
- Labels and Organizers: $30–$100
Estimated Total: For a moderate overhaul with a mix of shelving, cabinets, overhead racks, bins, and a workbench, expect to spend $1,200–$3,500. Costs can be reduced with DIY installation and repurposing existing materials.
Budget-Saving Tips
- Repurpose old cabinets or bookshelves for garage storage.
- Shop secondhand or look for local giveaways.
- Space out purchases—tackle one zone at a time as budget allows.
- Opt for DIY installation when possible.
Step 7: Installation and Setup—A Practical Walkthrough
Preparing the Space
- Clean the garage thoroughly, sweeping and addressing any leaks or cracks.
- Paint walls a light color to brighten the space and apply an epoxy floor coating for easy cleaning (optional).
Installing Wall and Overhead Storage
Start with wall-mounted systems:
- Use a stud finder to mark wall studs for secure anchoring.
- Install shelving and pegboards at accessible heights.
- Mount cabinets with heavy-duty hardware.
For overhead racks:
- Mark ceiling joists and use lag bolts for secure installation.
- Ensure clearance for garage doors and any ceiling fixtures.
Organizing and Labeling
- Place items in their designated zones, keeping frequently used items at eye level.
- Label bins and shelves clearly for easy identification.
- Hang tools on pegboards with outlines or labels for each item’s “home.”
Final Touches
- Install hooks or racks for bikes and ladders.
- Add a small mat or rug by entry doors to catch dirt.
- Keep a trash bin and recycling station handy to minimize future clutter.
Step 8: Maintenance Best Practices
Monthly and Seasonal Tasks
- Quickly sweep floors and wipe down surfaces monthly.
- Check for moisture, leaks, or pest activity every season.
- Rotate seasonal items (holiday decor, sports gear) as needed.
- Ensure safety items (fire extinguisher, first aid kit) are accessible and up to date.
Annual Deep Clean
- Empty and reorganize at least once a year to prevent accumulation.
- Review and purge unused items.
- Inspect shelving and racks for wear or damage, tightening hardware as needed.
Safety Checklist for Garage Organization Projects
- Wear gloves and safety glasses during installation.
- Secure all storage to studs or ceiling joists to prevent tipping or collapse.
- Keep chemicals, paints, and fuels in locked cabinets, away from children and pets.
- Maintain clear walkways and exits for emergency access.
- Store ladders horizontally or with safety brackets to prevent falls.
- Use GFCI outlets for power tools and avoid overloading circuits.
Conclusion: Enjoying Your Transformed Garage
A well-organized garage delivers far more than aesthetic appeal—it becomes a highly functional, safe, and valuable part of your home. By following this comprehensive step-by-step guide, you’ve not only reclaimed valuable square footage but also created a space that supports your hobbies, storage needs, and daily routines. From setting clear goals and choosing the right storage systems to budgeting smartly and maintaining your investment, each phase builds toward a clutter-free, efficient environment.
Remember, garage organization isn’t a one-time project but an evolving process. As your family’s needs change or new hobbies arise, revisit your setup and adjust zones or storage solutions accordingly. With a bit of planning and regular upkeep, your garage can remain a tidy, accessible, and safe asset for years to come. The sense of accomplishment—and the convenience of finding exactly what you need, when you need it—makes every ounce of effort worthwhile. Start your garage overhaul today and experience the transformation firsthand!


the focus on practicality in the article. Do you have advice for someone who already has basic shelves and cabinets but still ends up with chaos? Are there lesser-known organizing tools or strategies that made a big difference for you?
If shelves and cabinets aren’t enough, try grouping items by activity or frequency of use—like making a sports zone or a grab-and-go area for everyday tools. Wall-mounted racks for oddly shaped things (brooms, cords, ladders) can free up space. Clear bins with labels, magnetic strips for small metal tools, and ceiling-mounted storage for seasonal items are lesser-known solutions that help keep things visible and tidy.
When you suggest defining the garage’s purpose and setting priorities, how do you balance keeping space for a car with wanting to add a workbench or storage for hobbies? Any practical layout ideas for a single-car garage?
To balance parking your car and adding a workbench or hobby storage in a single-car garage, try zoning the space. Park the car slightly to one side to free up a wall for a compact workbench and vertical storage. Use wall-mounted shelves, pegboards, or overhead racks to maximize storage without taking up floor space. Foldable or mobile workbenches can also help you adapt the area as needed for different activities.
The article mentions measuring the garage and noting obstructions before planning the layout. Do you have any tips for handling garages with odd shapes or built-in fixtures that make standard storage solutions tricky to install?
For garages with odd shapes or built-in fixtures, start by creating a detailed sketch that includes every angle, bump-out, and obstruction. Customizable storage like adjustable shelving, modular wall panels, or ceiling-mounted racks can help work around tricky spots. If standard options don’t fit, consider using pegboards or stackable bins in smaller or irregular spaces. Sometimes, a mix of custom-built shelves and off-the-shelf units works best to maximize storage in unique layouts.
I’m interested in turning part of my garage into a small workshop but still need to store holiday decorations and park my car. How do you recommend balancing multiple priorities when planning zones or choosing storage solutions?
Start by mapping out your garage to define clear zones: one for your workshop, one for storage, and one for parking. Use vertical space with shelves or overhead racks for holiday decorations to free up floor space. Consider mobile workbenches or fold-down tables in your workshop area so you can easily reconfigure the space as needed. Prioritizing flexible, modular storage will help you adjust as your needs change.
You mention safety as a benefit of organizing the garage. Could you give some specific examples of safety hazards that people might overlook during the process, and how to address them while planning the layout?
Absolutely—some common safety hazards in garage organization include tripping over loose tools or items left on the floor, improperly stored chemicals that could spill or mix, and heavy objects placed on high shelves that might fall. To address these, be sure to keep walkways clear, store chemicals in locked cabinets away from heat, and place heavier items on lower shelves. Planning the layout with these points in mind can make your garage much safer.
How did you approach budgeting for your own garage overhaul? I’m wondering if there were any surprise costs with storage systems or if the bulk of the expense went to tools, shelving, or something else.
Budgeting for the garage overhaul started with listing everything I wanted to change or add, such as shelves, cabinets, and any new tools. Most of the expense actually went into storage systems like wall-mounted racks and sturdy shelving, which turned out to be pricier than expected. Some surprise costs included installation hardware and organizational bins. Tools were a smaller part of the budget since I already had most basics. Planning a buffer for unexpected expenses really helped keep things on track.
I’d like to transform part of my garage into a hobby area without losing too much storage space or the ability to park my car. Any advice on zoning or layout to balance these different functions effectively?
To balance a hobby area with storage and parking, dedicate one wall or corner to your hobby zone using modular shelving or a fold-down workbench that saves space when not in use. Use vertical storage for tools and supplies, and overhead racks for seasonal items. Mark clear zones on the floor if needed, ensuring your car parking area remains unobstructed. Smart zoning lets you enjoy your hobbies while keeping storage practical and your parking spot available.
When you mention measuring and mapping the garage, do you have any tips on dealing with awkward nooks or obstacles like water heaters and electrical panels? I always seem to lose usable space around those spots.
Awkward nooks and areas around water heaters or electrical panels can be tricky, but you can make the most of them by using slim shelving or pegboards that don’t block access. For safety, keep at least 3 feet clear in front of electrical panels and follow local codes for water heaters. Consider using overhead racks or wall hooks nearby for light or infrequently used items, maximizing every inch without crowding those essential spots.
What’s your advice for dealing with things we rarely use but can’t seem to part with, like holiday decorations or old sports equipment? Should I factor in a specific storage area for those, or find an alternative spot outside the garage?
Items you rarely use but want to keep—like holiday decorations or old sports equipment—are perfect candidates for high or out-of-the-way garage storage, such as overhead racks or shelves. Designate a specific area in the garage if possible, so these items are accessible yet not in the way. If space is tight, consider using a basement, attic, or even a shed, but keep ease of access in mind for seasonal swaps.
Once I’ve set my goals and measured the garage, what’s the best way to map out zones for different purposes, like gardening, sports gear, and tools? Is it better to use tape on the floor or just draw a plan on paper?
After setting your goals and measuring the garage, try sketching a simple floor plan on paper first, using your measurements to scale. This lets you easily move things around and visualize where each zone—like gardening, sports gear, and tools—will fit best. Once you have a draft you like, you can use painter’s tape on the floor to mark out the zones before moving in storage units and equipment. Combining both methods often makes planning and adjustments easier.