Introduction: Why Basement Waterproofing Should Top Your Home Improvement List
Water in your basement is more than just a nuisance—it’s a threat to your home’s foundation, air quality, and long-term value. Unchecked moisture leads to mold, structural decay, ruined possessions, and expensive repairs that could have been avoided. Whether you’re eyeing a basement remodel or simply want peace of mind, waterproofing is an investment that pays off in both comfort and property protection. Yet, many homeowners underestimate the complexity of getting it right—or don’t know where to start in terms of budgeting, products, and ongoing care. In this comprehensive guide, you’ll learn the step-by-step process of basement waterproofing, including honest cost breakdowns, material choices, and the crucial maintenance routines that keep water at bay for years to come. Get ready to transform your basement from a damp risk zone into a dry, healthy asset—without falling into common pitfalls.
Understanding the Real Risks: Why Basements Leak and What’s at Stake
Common Causes of Basement Water Intrusion
- Poor Exterior Drainage: Downspouts too close to the foundation, or ground sloping toward your house, can funnel water directly into basement walls.
- Hydrostatic Pressure: Saturated soil pushes water through cracks or porous concrete, especially after heavy rain or snow melt.
- Foundation Cracks: Even hairline cracks can be entry points for moisture.
- Failed Perimeter Drains: Old or clogged French drains and weeping tiles lose effectiveness over time.
- Poor Window Well Seals: Basement windows set below grade are prime targets for leaks.
What’s at Stake?
- Structural Damage: Ongoing moisture erodes concrete and can shift foundations.
- Mold and Air Quality: Damp environments foster mold, leading to poor indoor air and health risks.
- Ruined Belongings: Waterlogged boxes, furniture, and electronics are often unsalvageable.
- Loss of Living Space: A damp basement is unusable for living, storage, or recreation.
- Resale Value: Water issues are a red flag for buyers and can torpedo a home sale.
Step-by-Step Basement Waterproofing: From Assessment to Solution
Step 1: Thorough Inspection and Diagnosis
- Interior Inspection: Look for water stains, peeling paint, efflorescence (white powdery residue), musty odors, and visible mold.
- Exterior Walk-around: Check for cracks, standing water, and landscaping grading issues.
- Test During Rain: If possible, observe problem areas during or after heavy rain to spot active leaks.
Document all findings with photos. This will guide your scope of work and help if you hire a contractor.
Step 2: Addressing Exterior Drainage
- Extend Downspouts: Use extenders to direct water at least 6 feet away from the foundation.
- Correct Grading: Ensure soil slopes away from the house at a 2% grade for the first 10 feet.
- Install or Repair Gutters: Clean and repair gutters to keep water moving off the roof and away from the foundation.
Exterior fixes are the first defense—skipping them can undermine even the best interior waterproofing systems.
Step 3: Interior Crack Repair and Sealing
- Epoxy Injection: For structural cracks, inject epoxy or polyurethane foam to seal and bond the crack.
- Hydraulic Cement: Patch small holes or minor cracks with hydraulic cement, which expands as it cures to block leaks.
- Waterproof Paints and Sealers: Apply only as a supplementary measure, not a primary solution—they don’t stop water under pressure.
Note: Never use interior crack repairs as a substitute for fixing exterior water entry or drainage.
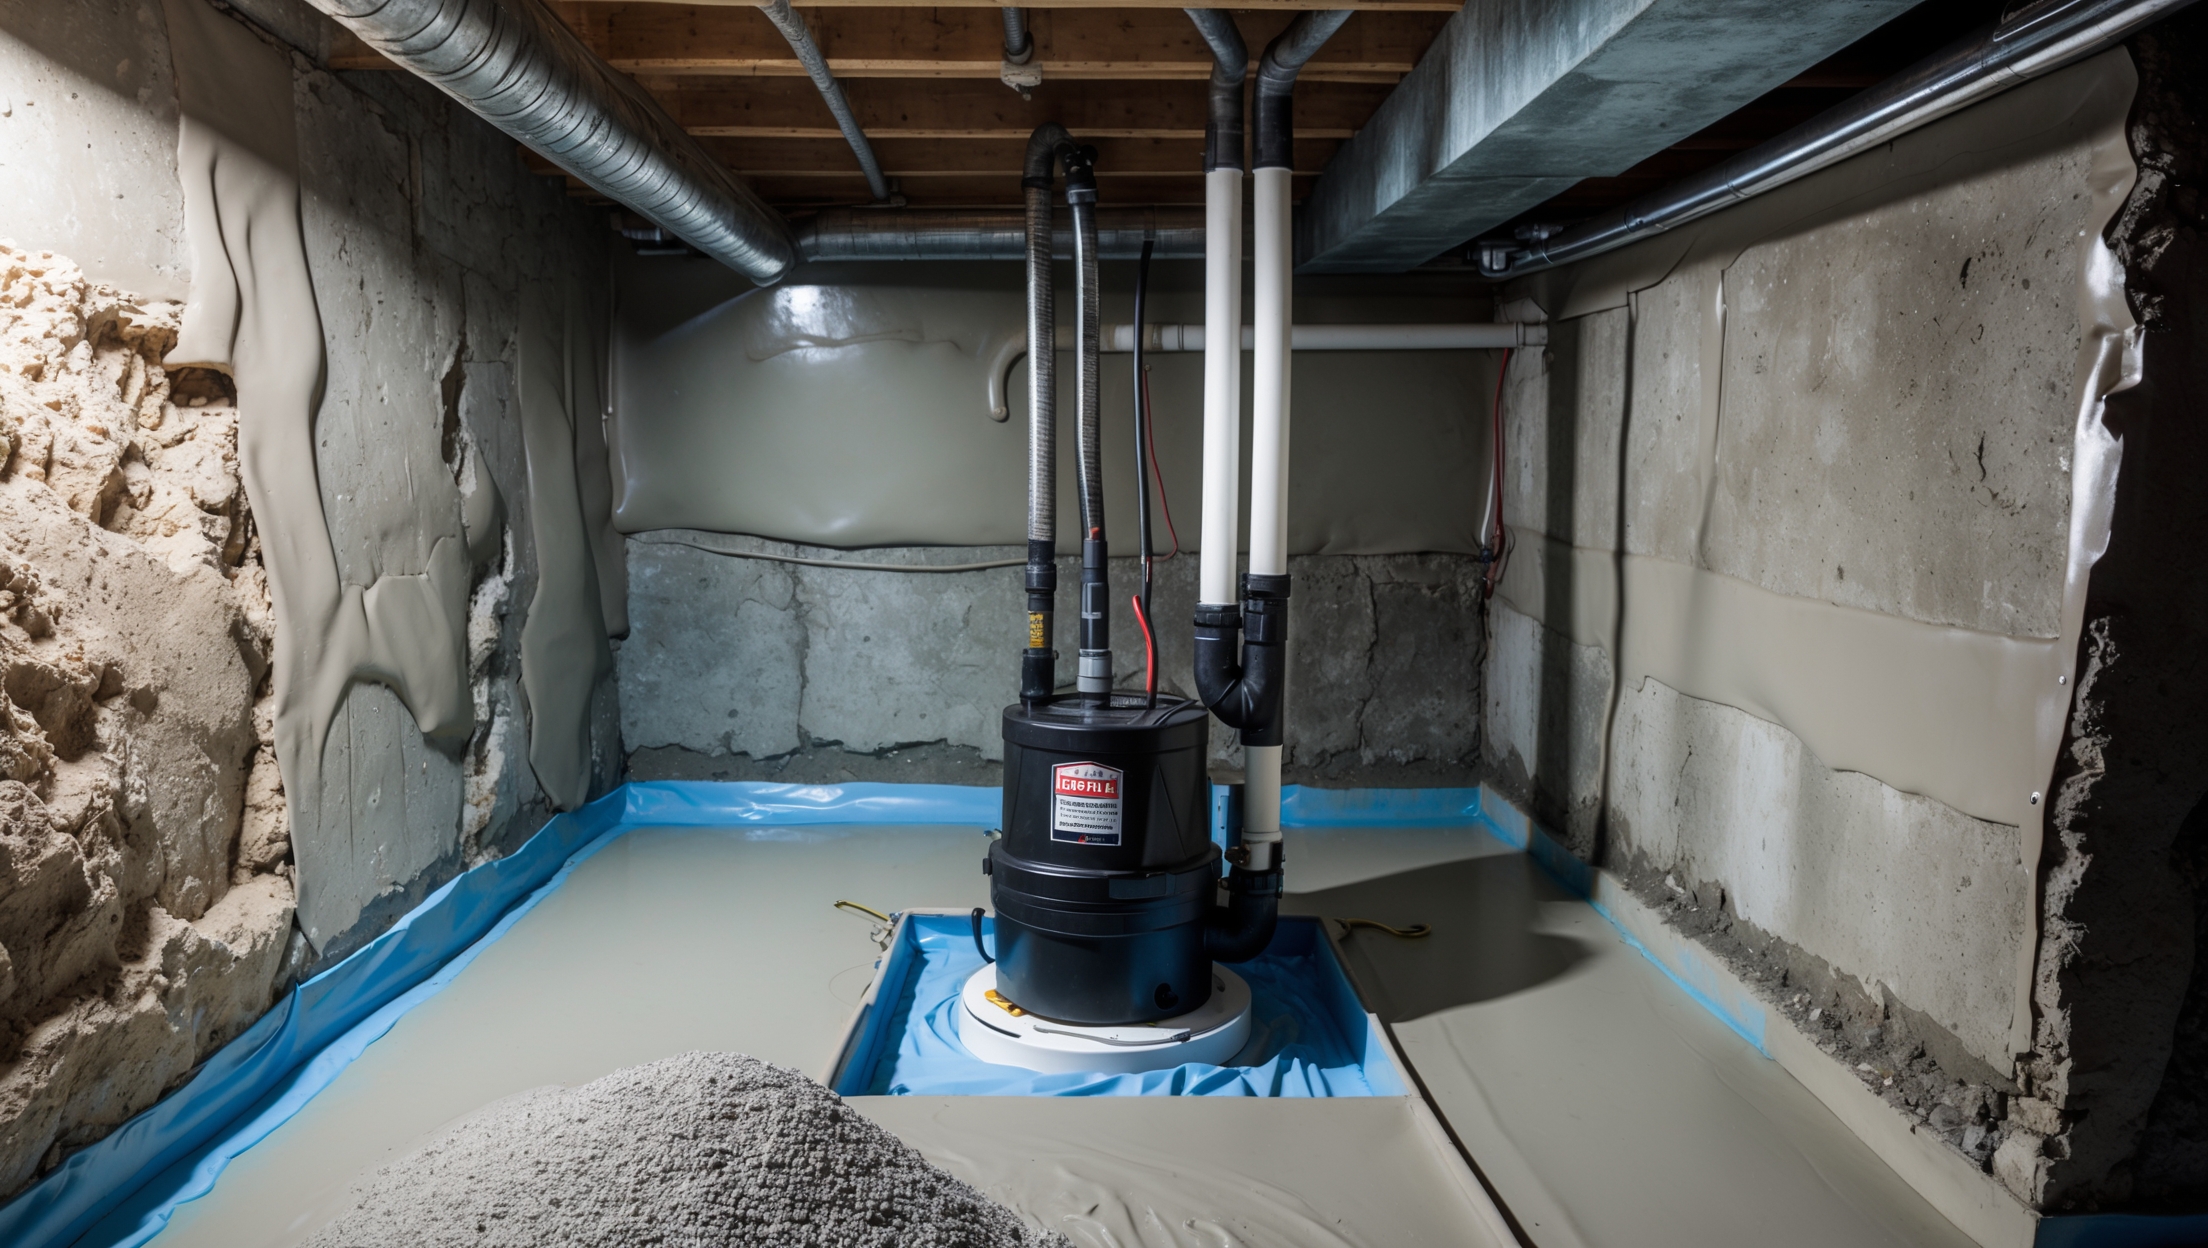
Step 4: Installing an Interior Drainage System
- French Drain (Interior Perimeter Drain): A trench is cut along the basement perimeter, a perforated pipe is installed, and everything is covered with gravel and concrete. Water is channeled to a sump basin.
- Sump Pump Installation: The sump basin collects water; the pump ejects it outside, away from the home.
- Vapor Barrier Installation: On unfinished walls, a heavy-duty plastic vapor barrier guides water down to the drain system.
This system is highly effective for chronic seepage and high water tables, but requires professional installation for best results.
Step 5: Exterior Waterproofing (The Gold Standard)
- Excavation: Soil is dug out around the foundation down to the footings.
- Wall Cleaning and Crack Repair: Exterior walls are cleaned and cracks are filled with hydraulic cement or epoxy.
- Application of Waterproof Membrane: A thick, rubberized asphalt or polymer membrane is applied to block water infiltration.
- Drainage Board Installation: Dimpled drainage boards direct water down to footing drains.
- New Drain Tile (French Drain): Perforated pipe is laid at the base of the foundation, leading to a storm drain or sump pump.
- Backfilling with Gravel: Soil is replaced, with gravel around the drain for improved flow.
This is the most thorough, longest-lasting solution—but also the most invasive and expensive.
Step 6: Basement Window and Entry Solutions
- Window Well Covers: Prevent rain and debris from pooling in window wells.
- Drainage in Window Wells: Install gravel and a vertical drain pipe to channel water away.
- Seal Window Frames: Use high-quality caulk and, where needed, replace failing window sills or frames.
Basement Waterproofing Cost Breakdown: What to Expect
DIY vs. Professional Costs
- DIY Patch Repairs: Crack repair kits and waterproof paints run $30–$300 per project. Effective only for minor, localized issues.
- Gutter and Drainage Upgrades: $200–$1,000 depending on length, materials, and if you hire help.
- Interior French Drain and Sump Pump: Professional installation averages $4,000–$12,000 for a complete basement. DIY kits exist but require concrete cutting expertise.
- Exterior Excavation and Waterproofing: $10,000–$25,000+ for full-perimeter jobs. Partial repairs can be less, but spot-treating rarely fixes core problems.
- Window Well Solutions: $500–$3,000 per window for new wells, covers, and drains.
Always factor in permits and potential landscaping restoration after exterior work.
Budgeting Pro Tips
- Start with the least expensive, highest-impact fixes (gutters, grading) before committing to major excavation.
- Don’t cut corners on sump pumps—reliable models with battery backup are worth the investment.
- Get multiple quotes for professional jobs—scope, warranty, and quality of materials vary widely.
- Ask about transferable warranties if you plan to sell your home in the future.
Essential Tools and Materials for Basement Waterproofing
- Epoxy or polyurethane crack injection kits
- Hydraulic cement patch
- Wire brush and concrete cleaner
- Heavy-duty caulk gun
- Waterproofing membrane or paint (for minor jobs)
- Perforated drain pipe (4-inch PVC or corrugated)
- Gravel (clean, washed)
- Sump basin and pump with check valve
- Plastic vapor barrier (10–20 mil poly sheeting)
- Shovel, wheelbarrow, and basic masonry tools
- Protective gear: gloves, eye protection, N95 mask (for dust and mold)
Optional but Recommended
- Battery backup for sump pump
- Dehumidifier for ongoing moisture control
- Moisture meter to monitor problem areas
Basement Waterproofing Maintenance: Keeping Problems from Coming Back
Seasonal Checklist
- Spring: Inspect for winter damage, check gutters and downspouts, clear window wells.
- Summer: Test sump pump operation, look for new cracks, monitor humidity levels.
- Fall: Clean gutters before leaf drop, check grading after summer rains.
- Winter: Ensure exterior drains are clear of ice and debris, run a dehumidifier as needed.
Best Practices for Longevity
- Test your sump pump before major storms—pour water into the basin and confirm ejection.
- Change pump batteries annually (if applicable).
- Seal any new cracks as soon as they appear.
- Keep all landscape plantings at least 18 inches from the foundation to prevent root intrusion and moisture build-up.
- Monitor for efflorescence—if you see it, there’s active moisture migration that needs addressing.
Common Basement Waterproofing Myths Debunked
- Myth: “Waterproof paint solves everything.”
Reality: Paints are only a surface barrier, ineffective against high water pressure or active leaks. - Myth: “One crack repair means no more leaks.”
Reality: Water finds the path of least resistance; one repair may just move the problem elsewhere. - Myth: “Sump pumps never fail.”
Reality: Power outages, mechanical failure, or clogs can leave you unprotected—maintenance and backup are essential. - Myth: “Exterior waterproofing is overkill.”
Reality: For chronic or severe water problems, it’s the only truly permanent solution.
When to Call in the Pros
- Visible mold or extensive water staining—remediation may require special safety protocols.
- Foundation movement or major cracks—structural repairs go beyond waterproofing.
- Recurring flooding despite attempted fixes.
- Major excavation or French drain installation—requires equipment, skill, and permits.
Always check contractor credentials, references, and warranty details before signing on for major work.
Conclusion: Invest in a Dry, Healthy Basement—And Peace of Mind
Basement waterproofing isn’t just another home improvement—it’s a shield protecting your home’s structure, your family’s health, and your financial investment. The steps outlined in this guide—from smart drainage upgrades and crack repairs to full-scale interior or exterior systems—are proven strategies to keep your basement dry for years to come. While some fixes are DIY-friendly, others call for professional expertise and should never be rushed or skipped. Remember, the true cost of waterproofing isn’t just measured in dollars spent, but in headaches and damage avoided down the road. Ongoing maintenance—such as regular inspections, gutter care, and sump pump testing—ensures your efforts continue to pay off every season. By investing the time and resources now, you’ll gain the peace of mind that comes with a basement that’s as safe, usable, and valuable as every other space in your home. Don’t wait for the next storm or leak to take action—start planning your basement waterproofing project today and enjoy a dry, healthy home for years to come.